Friday, February 03, 2006

Its been a while...

Hey! to anyone who actually reads this site. I apologize for not being on here for about...over a month. Been busy with some stuff, school, the gtads project, work, you name it i've been busy with it but let me update you on what i've been doing in terms of the GBMP3 project finally :-).
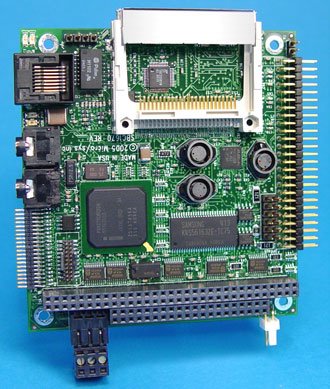
Embedded Systems:

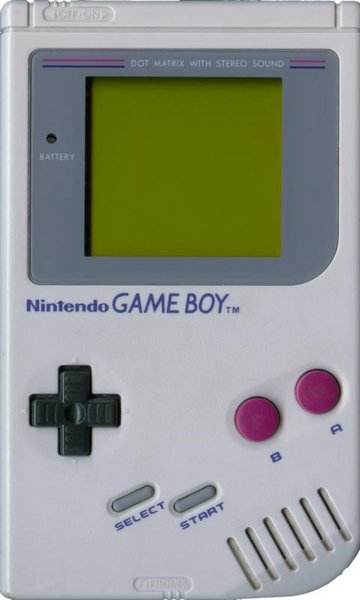
As you may have read I was eyeing a really nice piece of hardware that would be perfect inside of my old 1989 gameboy. This was available through the company embedded systems. I had requested a catalog from them to see what else there was, perhaps something even better. So 2 or 3 weeks go by before the catalog comes and it is huge! Perhaps 200 pages but pretty nice.

Raising funds:

Going to school and work at the same time isn't easy, especially money-wise when you want to buy cool stuff to play with, such as a gameboy that has had a brain transplant. So for the next couple of weeks I am going to be saving up roughly $300 for necessary parts to get the gameboy project going. I will keep you updated on my fiscal progress as well as any other cool things I see on the way.

Friday, December 23, 2005

The LCD under the hood

Yeah, I told you I would eventually find the schematics for the gameboy LCD and this brings back a lot of Digital Circuit Design memories. As the gameboy specs I mentioned in this post the LDC does 160 columns by 144 Lines. I am just hoping that the PC/104 board I decide to purchase support this, perhaps with some tweaking.

And without further ado, the gameboy LCD schematic :-) :


If you want a closer look you can just click on the schematic.


I have a feeling that one of the defining points to making this project a reality is getting the LCD to work with the PC/104 board and especially buying a board that is made for LCD out will help. There may be a small possibility that I will have to tweak things but we can always hope it won't come to this. :-D

Thursday, December 22, 2005


The Holt Head Screw seems to the be the screw of choice for the gameboy. I have had luck getting only one of the screws off with the crappy screw driver, which was thin enough to get into the spot. I am afraid to strip the other screws and I will probably have to go out and spend some money on a decent screw driver to get this out. I love proprietary tamper-proof screws. They get the job done and have succeeded in getting me officially pissed off. I want more than anything to crack open the gameboy and see what I have to work with. As opposed to what I originally thought, I might have less breathing room than I thought with the cartridge area taking up roughly half the thickness of the gameboy and some drastic modifications may have to occur.

I don't really want to change the Gameboy too much from its original (on the outside at least :-) ) but I would like that PC/104 i've been eyeing as a potential candidate for use to fit and work out. If anything more research will bring more answers as where to proceed and opening up the gameboy will provide those answers.

For a second lets show what the GameBoy specs are from under the hood:

CPU
Custom 8-bit Sharp Z80 at 4.194304 MHz (has a slightly different instruction set than a standard Z80, and integrated sound generation)
RAM
8 kByte internal S-RAM
Video RAM
8 kByte internal
ROM
256 kbit, 512 kbit, 1 Mbit, 2 Mbit and 4 Mbit and 8 Mbit cartridges
Sound
4 channel stereo sound. The unit only has one speaker, but headphones provide stereo sound
Display
Reflective LCD 160 x 144 pixels
Screen Size
66 mm (2.6 in) diagonal
Color Palette
4 shades of "gray" (green to black)
Communication
Up to 4 Game Boys can be linked together via serial ports
Power
6 V, 0.7 W (4 AA batteries provide ~35 hours)
Dimensions
90mm(W) x 148mm(H) x 32mm(D)/3.5 x 5.8 x 1.3 (inch)

(Courtesy of Wikipedia)

It will be cool pushing this thing from a 4Mhz Z80 processor to a 300Mhz+ ARM processor. The sound will definitely have to go, and with a little research, the power source will come into question (6V might be enough but I am not an EE to really know).

Wednesday, December 21, 2005

GBMp3 Holiday shopping list

Well its about time that I go looking for a the actual parts for my mp3 player now. Before seriously going along with this I had to think about some realistic components that would fit the following criteria:

- Fit into the GameBoy Chassis
- Would be relatively low power.
- Would have a lot of expansion ports (hard drive, network, display)
- Wouldn't cost a ridiculous* amount of money

While searching briefly I remembered about PC104 components that have PC board capabilities in a very small build. A CPU board should be a perfect fit inside the gameboy and allow room for a small form hard drive (perhaps solid state) etc.

Since anything pentium or faster would be a sure killer of power I think i'll need to look for something a little more power reserved. Many small handheld devices these days utilize the low-powered ARM processor and that will probably be my route. 15 minutes of searching brought me this:

SBC1670
XScale PC/104 Computer with LCD Panel Support

* 520 MHz Low-power ARM processor
* 800 X 600 Color LCD interface
* 10/100BASE-T Ethernet
* Five serial ports
* Debounced keypad interface
* Extended temperature available


520 Mhz is plenty for a player of music and other non-intensive things...like playing gameboy games :-).

According to the specs manual it allows additional storage in addition to the compact flash which would house the Operating System and utilities.


Well I have to leave work, was just using a few moments to comment on the board.

Tuesday, December 20, 2005

A gameboy motivation


So, it was last week that I was sitting around with my girlfriend watching some television and playing burnout revenge on the playstation 2, things we usually do on these frigid weekends, when I had found my old gameboy (we're talking about a 1989 model) from all those years ago. Ever since my PVR (personal video recorder) computer I had built in the fall of 2003 I had been very interested in mini boards and making cooler more useful things out of odd appliances. Taking a look at mini-itx you will see all the cool projects people have toyed with with ITX motherboards, which are little 17cmx17cm PC motherboards. So the idea had dawned into my head to try to create a small computer appliance out of my gameboy. The easiest application I thought would make sense with the amount of buttons the gameboy has was making it as an mp3 player. Now before anyone says anything further about the fact that the ancient gameboys are giant bricks, I will get to all of the reasoning towards the end of this entry.
What also brought me to pursuing this project and actually put a blog about it is the fact that the gameboy is pretty big and infact there are pieces of electronics needed will probably fit easily into the casing of the gameboy. The second reason I can think of is that since the gameboy is old, I can probably find some sort of schematics on the display and the buttons documented by hobbists who were interested enough to do so. I know a few years back looking online I found the schematics for the multiplayer cord for the original gameboys and the gameboy advance. My final quick reason for even doing this is the coolness factor. Imagine taking a vintage gameboy around that played all your favorite songs and weren't even limited to mp3 functionality.
To be realistic I have a little experience with digital logic and machine state design (I still have the books and know how to work with digitial circuits) and I know that this project will not be an overnight one or a cheap one at that. While I am typing this on my futon I have the gameboy test subject #00001 looking at me with a blank uncertainty. I intend to keep this blog up for my friends and anyone else who will care to check out the project and perhaps provide some insight on it. This also isn't something that I will have ridiculous amounts of time to work on as I am a college student (CS major), work as a java developer for a small financial company, have another software project going on (check it out), and friends to spend time with. With this being said, let the project begin. I have my work cut out for me and I do hope for a successful and fun outcome.